
Technical Tip: FortiGate HTTPS/SSL Certificate Installation (PFX, PKCS12, PEM and CER)
Description
This article describes why a valid SSL certificate is necessary and how to install the newly generated certificate on FortiGate for HTTPS access and SSL VPN.
Scope
FortiOS v7.0 and above.
Solution
The Certificate can be used for client and server authentication based on requirements and the certificate types.
There are four different sections of the certificate on FortiGate:
Local CA Certificate.
Local Certificate.
Remote CA Certificate.
Remote Certificate.
Open the certificate panel by navigating to System -> Certificates.
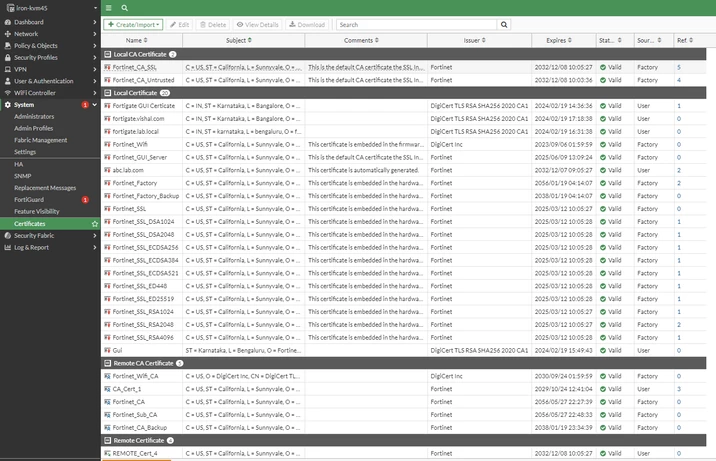
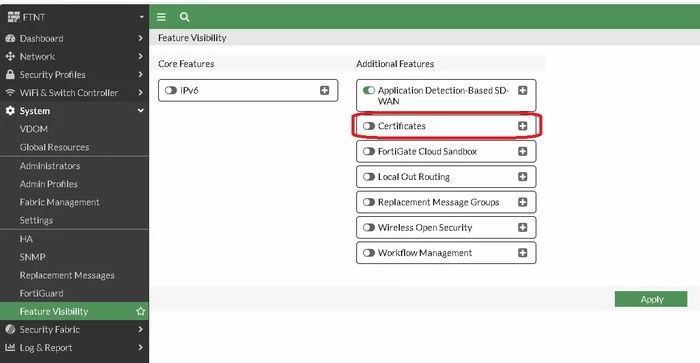
Enable the feature under System -> Feature Visibility if necessary.
Local CA certificate:
As the name implies, these are the default certificates that are generated the first time when the FortiGate is booted up. These certificates are generally used for SSL Inspection. Root CA certificates that are imported (along with the private key) in the FortiGate are viewable.
Local certificate:
This section consists of the default certificate and any other certificate that is installed on the FortiGate with the private key, so either (PEM + Private Key) or PKCS12 format certificate. It also contains self-signed certificates and Sub-CA (Intermediary CA) certificates imported into the FortiGate.
Local certificate examples:
FortiGate GUI certificate.
SSL VPN certificate.
Site-to-Site VPN Local certificate.
Virtual server certificate used for SSL offloading.
Remote CA certificate:
FortiGate comes with many CA certificates from well-known certificate authorities pre-installed, which will not show in the GUI. Other CA certificates from a non-well-known CA FortiGate are viewable in the Remote CA Certificate section.
If an administrator uploads a certificate file containing an already installed CA certificate, the installation will fail with the error 'Certificate file is duplicated for CA/LOCAL/REMOTE/CRL cert'; see Troubleshooting Tip: Fixing the error 'Certificate file is duplicated for CA/LOCAL/REMOTE/CRL cert.'.

Note: If a CA certificate is imported as shown in Technical Tip: How to avoid certificate error message by chaining Root CA and Intermediate CA certificates on FortiGate, FortiOS will also treat that certificate as a trusted CA for purposes of SSL inspection.
Remote CA certificate examples:
LDAPS.
Site-to-site or Remote Access VPN with signature authentication; see Technical Tip: How to configure IPsec dialup VPN with certificate based authentication.
PKI system administrator; see Technical Tip: Configure admin certificate authentication.
FSSO Trusted SSL Certificate, see Technical Tip: Fortinet Single Sign On (FSSO) Agent SSL connection to FortiGate.
Remote certificate:
To install any certificate in PEM format without any private key, choose the remote certificate (similar to the remote CA certificate but not the same, as uploading the end-entity).
Remote certificate examples:
Remote IDP or SP certificate in Security Fabric SSO Configuration; see Configuring certificates for SAML SSO.
FSSO Trusted SSL Certificate.
Local SSL VPN and HTTPS certificate:
The remainder of this article provides a guide to installing a custom local certificate for use with FortiGate administrator GUI or user SSL VPN.
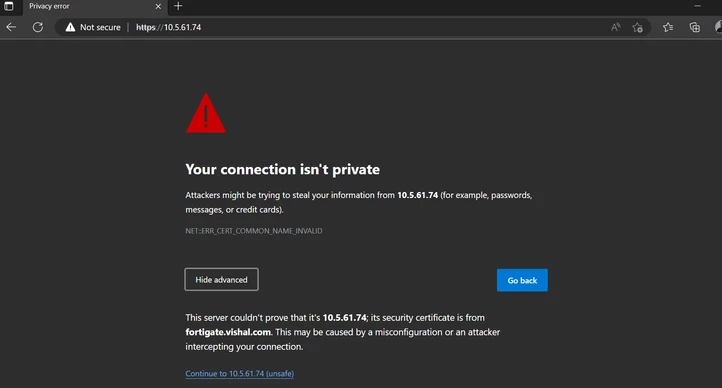
When the SSL VPN is configured or the HTTPS access is enabled on the FortiGate WAN interface, it uses the default FortiGate certificate, and it gives an error because the machine or the end client does not trust the certificate, as the FortiGate CA is not installed on machines.
Often, when a user receives a security certificate warning, the user simply selects 'Continue' without understanding why the error is occurring.
To avoid encouraging this habit, it is possible to prevent the warning from appearing in the first place:
Note: The SSL VPN certificate is a server certificate of FortiGate and not for user certificate authentication.
To use client certificate authentication, install an identity certificate on the client machine and a CA certificate on FortiGate.
To overcome this, generate an SSL certificate with a 'Domain-name' associated with the Public (WAN) IP, signed by a well-known Third-party certificate authority.
Firstly, a domain name will be necessary to purchase the A record for the public IP. Note that Dynamic DNS services such as FortiGuard DDNS generally cannot be used in conjunction with Third-party certificate authorities requiring domain validation (DV), as dynamic DNS services do not allow the creation of the special DNS records needed for DV.
Note: In modern browsers, the certificate needs to contain the address used to access the GUI. This IP or FQDN needs to be included in the Subject Alternative Name (SAN) field of the certificate (It is applicable for a Certificate Signed by an Internal CA also).
For example:
FortiGate accessed via https://192.0.2.1/... → Certificate SAN must include 192.0.2.1.
FortiGate accessed via https://firewall.mydomain.com/... → Certificate SAN must include firewall.mydomain.com (or *.mydomain.com).
For the sake of completeness, the other usual certificate requirements are still in place (Non-exhaustive list: the certificate must be within its validity period, must be signed by a CA trusted by the client device, and should not use a SHA1 signature(no longer trusted).
Generate CSR from FortiGate:
Go to System -> Certificates -> Create/Import -> Generate CSR.
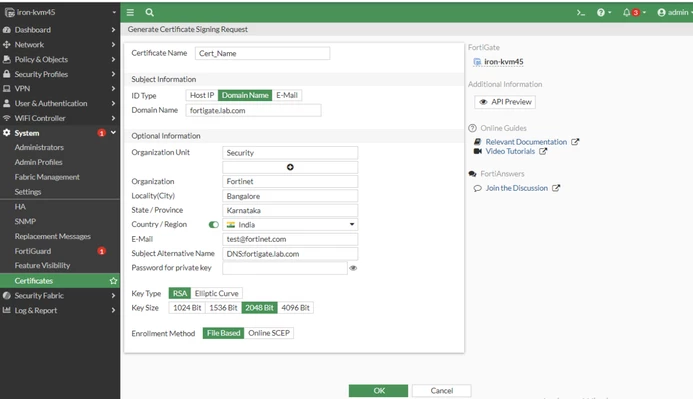
Select the newly generated CSR and download the file:
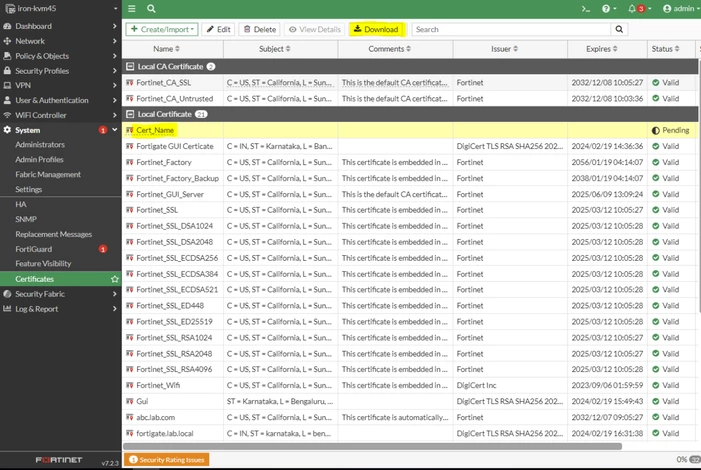
Note: CSR can be generated using third-party tools, but a PFX, PKCS12, or PEM format certificate with a Private key file is needed upon installation.
Related documents:
Technical Tip: Adding SAN(Subject Alternative Name) while generating CSR(Certificate Signing Request)
Technical Tip: How to sign a certificate with Subject Alternate Name (SAN)
Using the default certificate for HTTPS administrative access: More info on SAN.
Upload the generated CSR to the chosen vendor site, which will then provide the certificate.
Download the certificate and follow the steps below to install the certificate. Extract the downloaded file(s) to the Desktop or a new directory altogether.
Certificates will be mostly in the following four formats:
PEM, PKCS7: the private key file will be needed to install the certificate if the CSR is not generated by FortiGate; otherwise, a PEM file is enough.
PFX, PKCS12: It requires the passphrase or passcode to install.
Also, the intermediate and root CA will be obtained; generally, all 3rd party root CAs are already present in FortiGate by default.
Importing the SSL Certificate:
The first scenario: the CSR is generated by FortiGate:
PEM/PKCS7/CER: If the CSR is generated from FortiGate, then a PEM, PKCS7, or .cer format cert will only be required.
Note: If the CSR is signed by a Public CA, there are instances where the .crt file format is provided in the CER folder. It must be renamed to .cer by editing the file in Notepad and saving it as .cer. Once changed, it can be imported into the FortiGate certificate.
Navigate to System -> Certificates -> Create/Import -> Certificate -> Import Certificate, select type as Local Certificate, upload the PEM Certificate, and select 'Create'. The certificate will be generated.
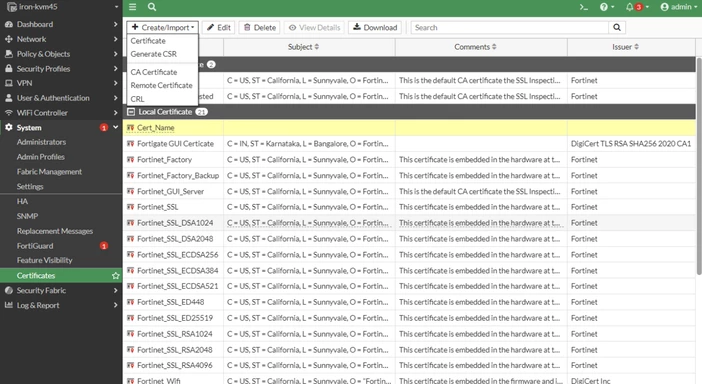
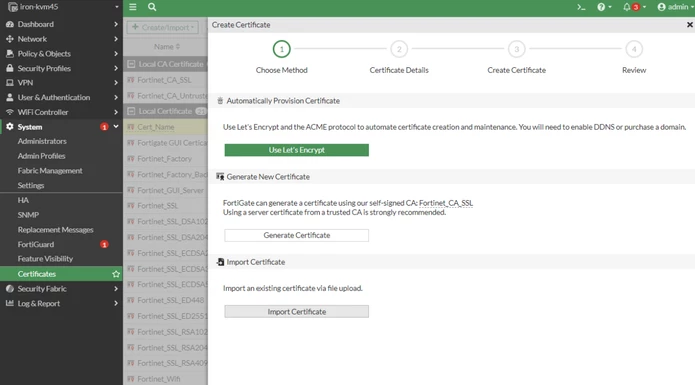
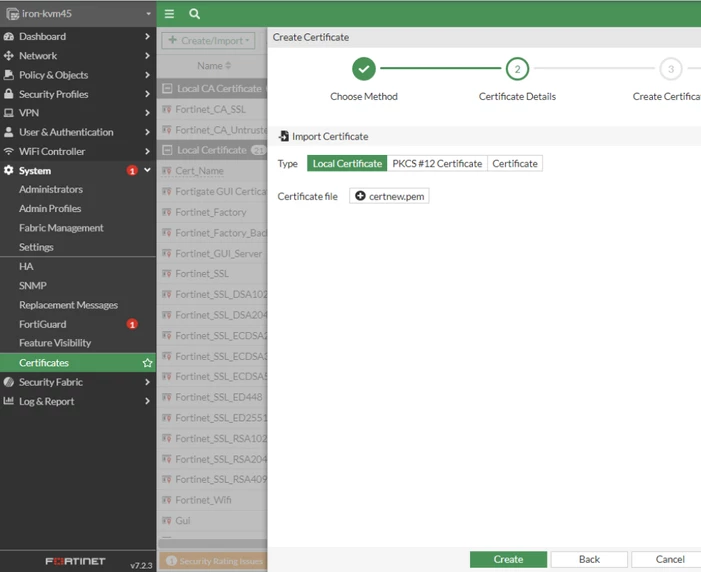
The second scenario is if the CSR was generated using a third-party server, and there is a PEM file:
PEM/PKCS7/CER and Private key: If the CSR was generated using a third-party server and the certificate provided by the CA vendor is in PEM format, the Private key file will be necessary with the PEM file.
Navigate to System -> Certificates -> Create/Import -> Certificate -> Import Certificate, select the type as Certificate, import the PEM cert with the private key, create the password, add the certificate name, and select 'Create'. The certificate will be uploaded.
Note: The password here is something created by the user. It is possible to use any numeric or alphanumeric string; basically, the password here is being used to merge the PEM and Private key.
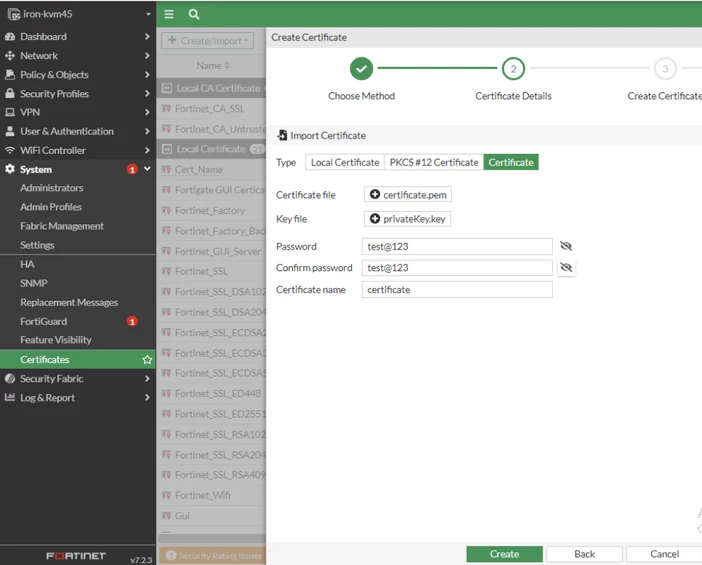
The third Scenario is if the CSR was generated using a third-party server, and there is a PFX/PKCS12 format certificate:
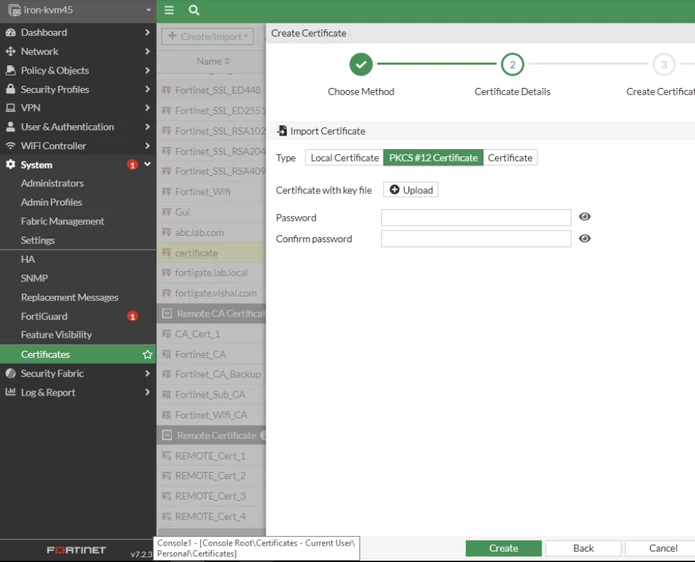
PFX, PKCS12: If there is a PFX certificate, the passphrase or password to install the Certificate that will be provided by the CA vendor will be needed.
Navigate to System -> Certificates -> Create/Import -> Certificate -> Import Certificate, select the type as PKCS12, upload the certificate, use the Password/Paraphrase provided by the CA vendor, and select 'Create'.
Note: Sometimes a CSR may be deleted, either knowingly or unknowingly, which can result in the following error:
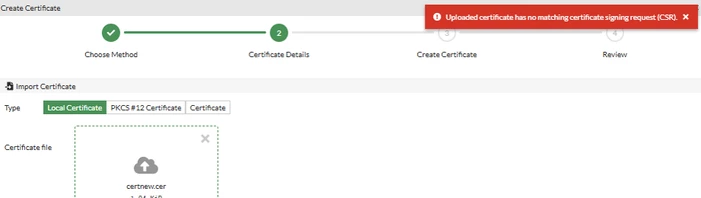
In such cases, a new CSR needs to be regenerated and imported on the 'FortiGate'.
Once the certificate is uploaded, it is possible to select the uploaded certificate for HTTPS access and SSL VPN.
Navigate to System -> Settings -> HTTPS server certificate, select the certificate, and apply.
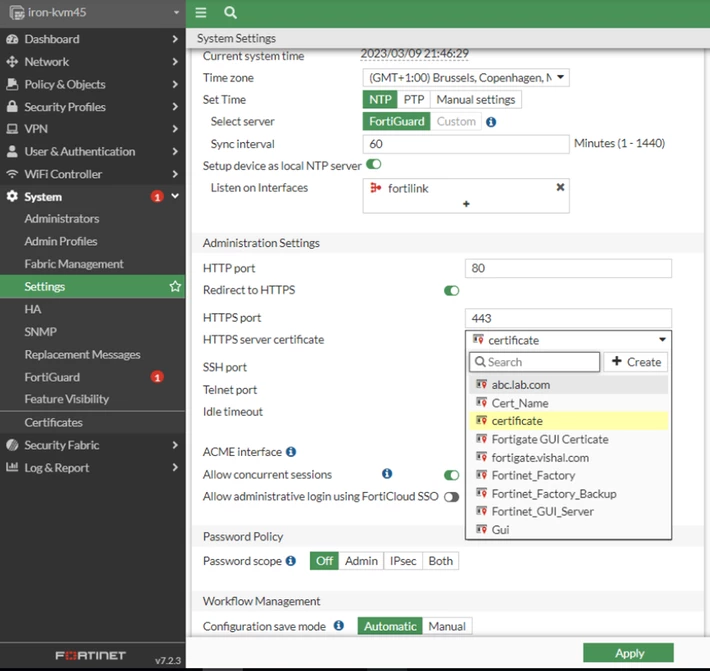
To apply the HTTPS server certificate through the CLI, use the command below:
config system global
    set admin-server-cert <certificate_name>
end
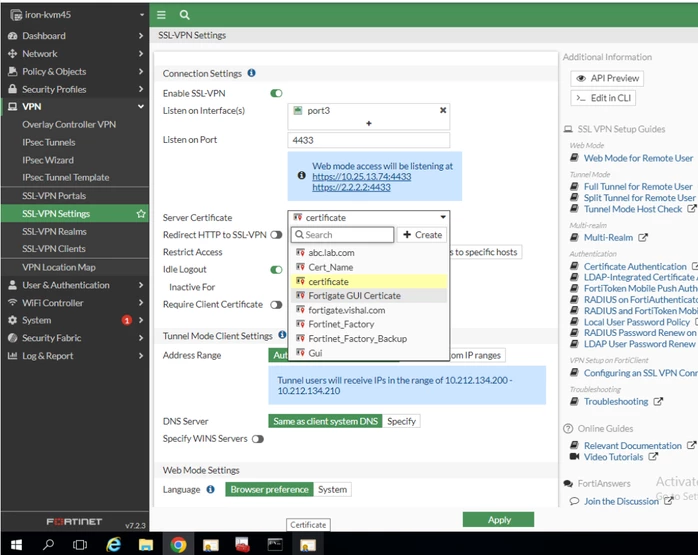
Navigate to VPN -> SSL VPN settings -> Server certificate, select the certificate, and apply.
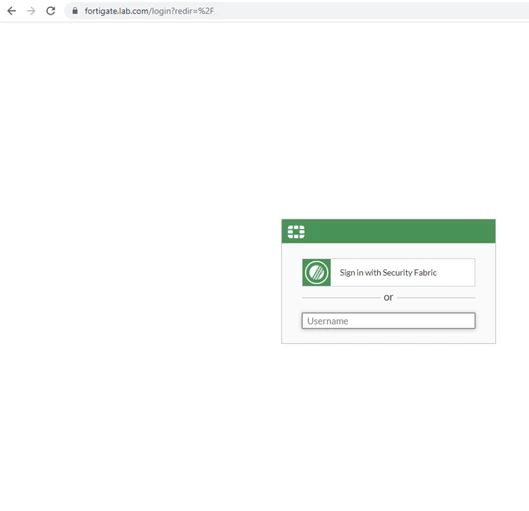
Note: If the certificate is generated by a local CA, it will be necessary to install the CA certificate on the client machine.
Related concepts:
It is possible to use an Automated Certificate Management Environment (ACME) and get a free SSL certificate from the public Let's Encrypt certificate authority (https://letsencrypt.org). For more information, see the following guide: Automatically provision a certificate.
Additionally, see RFC 8555: Automatic Certificate Management Environment (ACME).To use Microsoft Intermediate CA for a Deep SSL Inspection Certificate, see Microsoft CA deep packet inspection.
To regenerate the default certificate, see Regenerate default certificates.
Guide to FortiGate and certificate issues: Troubleshooting Tip: A guide to FortiGate and certificate issues.
