




Technical Tip: Generate CSR via FortiGate CLI
Description
This article explains how to generate a CSR in the FortiGate CLI.
Scope
FortiGate.
Solution
To generate a CSR from the FortiGate CLI, the following command can be used –
'execute vpn certificate [store] generate [...]'
Command Syntax:
execute vpn certificate [store] generate [encryption_method] [certificate_name] [key_size] [Host IP/Domain Name/E-Mail] [Country Name or Code] [State/Province] [City] [Organization] [Organization Unit] [Email] [SANs - optional] [URL of the CA server for signing via SCEP (optional)]
Command Options:
store: ca, crl, local, remote
encryption_method: rsa, elliptic curve
cert_name: Name for Certificate, purely meant as an indentifier
key_Size: Key Encyrption Size, Options are 1024, 1536, 2048, 4096
Host IP/Domain Name/E-Mail: Common Name, the name the certificate is signed for
Country: Country name or Country Code such as CA (Canada)
State/Province: State or Province Name such as BC (British Columbia)
City: City Name
Organization: Organization Name
Organization Unit: Organizational Unit, similar to Directories in a Directory Service
Email: Email address for IT Contact
SANS: Other accepted names, should include CN if CN is to be accepted
SAN Syntax
Email: email:admin@companyname.com
IP Address: IP:1.1.1.1
URL: URI:http://companyname.com
DNS Name: DNS:www.companyname.com
Note - Multiple SANs should be separated by comma (,) and without a space such as DNS:www.companyname.com,DNS:www.companyname1.com,DNS:www.companyname2.com
SCEP: URL of the CA server for signing via SCEP
Example:
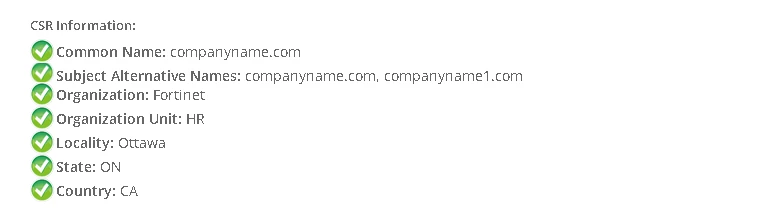
execute vpn certificate local generate rsa TestCSR 2048 companyname.com CA ON Ottawa Fortinet HR admin@companyname.com DNS:companyname.com,DNS:companyname1.com
Field Values -
Certificate Name: TestCSR
Key Size: 2048
CN: companyname.com
Country: CA (Canada)
State/Province: ON (Ontario)
City: Ottawa
Organization: Fortinet
OU: HR
Email: admin@companyname.com
SANS:
>DNS Name=companyname.com
>DNS Name=companyname1.com
A message stating "Global certificate Signing State: Pending" will be produced if the CSR is successfully generated.
Downloading/retrieving the CSR from the CLI:
There are two methods available for retrieving the CSR from the FortiGate so that it can be signed by a Certificate Authority:
Method #1: Exporting from the FortiGate via TFTP:
execute vpn certificate [store] export tftp [certificate_name] [certificate_file_type ('cer' | 'p12' | 'csr')] [destination_filename] [TFTP_IP/FQDN]
Example:
exec vpn certificate local export tftp TestCSR csr TestCSR.csr 192.168.1.100
Method #2: Copy/Paste from FortiOS CLI:
- Run the command show full vpn certificate [store] [certificate_name] (Example: # show full vpn certificate local TestCSR).
- Note that in a VDOM configuration, Global certificates will be stored under config certificate [...], whereas VDOM certificates will be stored under config vpn certificate [...] within each VDOM.
- Find the set csr section and copy the contents in-between the quotation marks (i.e. Everything in-between and including -----BEGIN CERTIFICATE REQUEST----- to -----END CERTIFICATE REQUEST----).
- Paste the contents into a text editor and save the file.
Uploading the signed certificate to the FortiGate via the CLI:
There are two methods available for uploading the signed certificate to the FortiGate and completing the certificate setup process:
Method #1: Uploading from the FortiGate via TFTP:
execute vpn certificate [store] import tftp [certificate_name] [TFTP_IP/FQDN] [certificate_file_type ('cer' | 'p12')] [<Enter> | <password> (for PKCS12 file)]
Method #2: Copy/Paste to the FortiOS CLI:
- In the CLI, navigate to the certificate using the following commands:
config vpn certificate [store]
edit [certificate_name]
- Once in the CLI config section for the certificate being worked on, type set certificate " (note that this is a singular quotation character; single- or double-quote is fine here), but do not hit enter yet.
- Open the certificate file in a text editor and copy the entire contents (i.e. Everything in-between and including -----BEGIN CERTIFICATE----- to -----END CERTIFICATE----) then paste the contents into the FortiGate CLI, but do not hit enter after pasting. You will see multiple > characters signifying a multi-line input.
- Type a second quotation mark (' or " to match the initial quotation) and then hit enter.
- Finally, type end and hit enter to commit the change. Once this has been done, you can re-run show full vpn certificate [store] [certificate_name] and confirm that the set certificate option is now populated with your cert contents.
Important Notes
- Multiple values to a field can be entered by a using a comma (,) without using a space. For example:

When using a comma the FortiGate give us an option to add another email instead of the next field.
- Every field is separated by a space which indicates a start of the next expected field in the syntax. So, if given a space while providing multiple values for a single field, the FortiGate will put the value in the next field. For example:

By putting a space after a comma (,) in the SAN field, the FortiGate expects SCEP instead of another DNS name.
If multiple SANs are added with a space after the comma, it will produce the following error:

This is expected because now the FortiGate is expecting DNS:companyname1.com as SCEP value instead of the SAN.
- Once the CSR is generated successfully, a CSR decoder tool can be used to confirm the values of each field. Download the CSR > Open using a text editor > Copy and paste the content in a CSR decoder. For example:
Related article: