
Technical Tip: Email Based two-factor Authentication
Description
This article describes how to configure and troubleshoot the Two-Factor Autentication (2FA) with the help of the email ID.
Solution
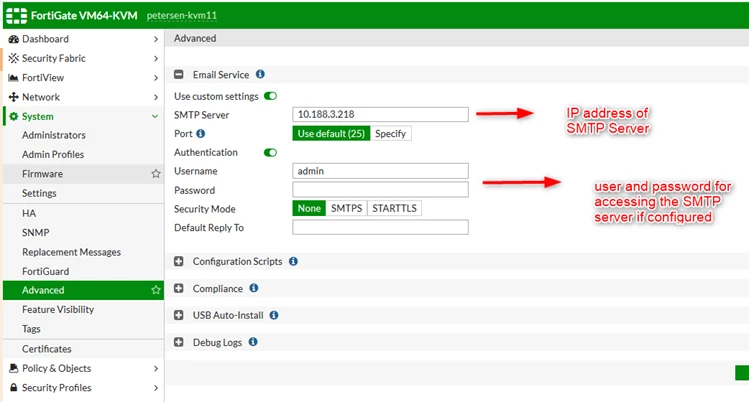
Step 1: Configure SMTP server
Go to System -> Advance -> Email Service and fill in the fields as shown below:
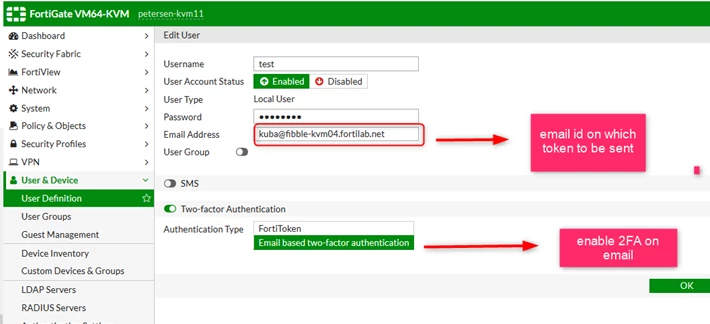
Step 2: Configure email base 2FA for user
Go to User & Device -> user Definition -> Create or Edit user (if available) and fill in the fields as shown below:
How to set 2FA email via CLI:
Note: If this option is not available in GUI, it can be enabled via GUI
Step 3: Troubleshoot Debug command
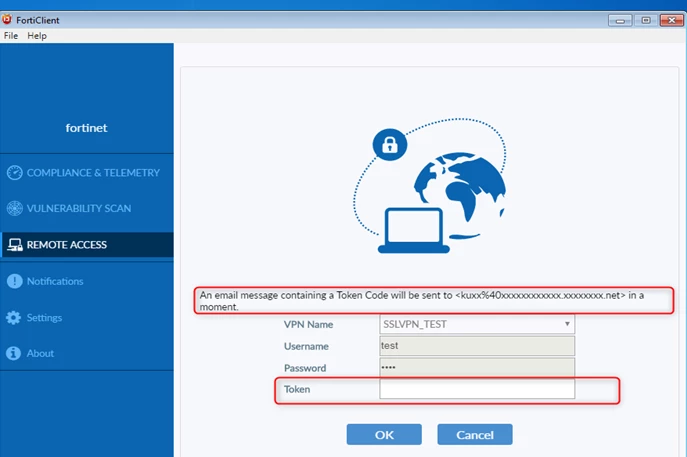
Step 4: Verification
After adding the user name and password, enter the token received via email in the "Token" field, as shown below:
This article describes how to configure and troubleshoot the Two-Factor Autentication (2FA) with the help of the email ID.
Solution
Step 1: Configure SMTP server
Go to System -> Advance -> Email Service and fill in the fields as shown below:
Go to User & Device -> user Definition -> Create or Edit user (if available) and fill in the fields as shown below:
Note: If this option is not available in GUI, it can be enabled via GUI
# config user local
edit "test"
set type password
set two-factor email <---------- set 2FA to email
set email-to "kuba@fibble-kvm04.fortilab.net" <---------- user email id
set passwd-time 2019-08-27 10:03:35
set passwd ENC EavlDNhUGxHOih5r00YAVRg2bcEb3pHM5GSmSJPfQ==
next
Step 3: Troubleshoot Debug command
# diagnose debug application alertmail -1 |
Debug messages will be on for 30 minutes. |
|----> debug command
# diagnose debug enable |
# Arrived msg(type 6, 93 bytes):kuba@fibble-kvm04.fortilab.net
AuthCode: 367809
Your authentication token code is 367809.
mail_info: |
from:10.188.3.218 user:kuba@fibble-kvm04.fortilab.net |
mail_info: |------> email info
reverse path:kuba@fibble-kvm04.fortilab.net |
user name:kuba |
to[0]:kuba@fibble-kvm.fortilab.net |
<==_init_mail_info
create session
resolve 10.188.3.218 to 1 IP ---------------> SMTP server
==> send mail
connecting to 10.188.3.218 port 25
send mail 0xaf35c90 session 0xb04ed70
session: 0xb04ed70, rsp_state: greeting, code: 220
session: 0xb04ed70, rsp_state: ehlo, code 250
session: 0xb04ed70, rsp_state: mail, code: 250
session: 0xb04ed70, rsp_state: rcpt, code:250
session: 0xb04ed70, rsp_state: data, code: 354
=== send: Your authentication token code is 367809. --------> Token sent
session: 0xb04ed70, rsp_state: data2, code: 250
session: 0xb04ed70, rsp_state: quit, code: 221
session finished
_session_on_destroy
<== send mail success, m = 0xaf35c90 s = 0xb04ed70
After adding the user name and password, enter the token received via email in the "Token" field, as shown below:
For Version 6.4
There is no option available 'Advanced' in 6.4 version.
System -> Settings -> Email Service.
System -> Settings -> Email Service.
