Solution | The Policy Routes feature is not visible by default. To enable it, navigate to Firewall GUI -> System -> Feature Visibility, then enable Advanced Routing and select 'Apply':
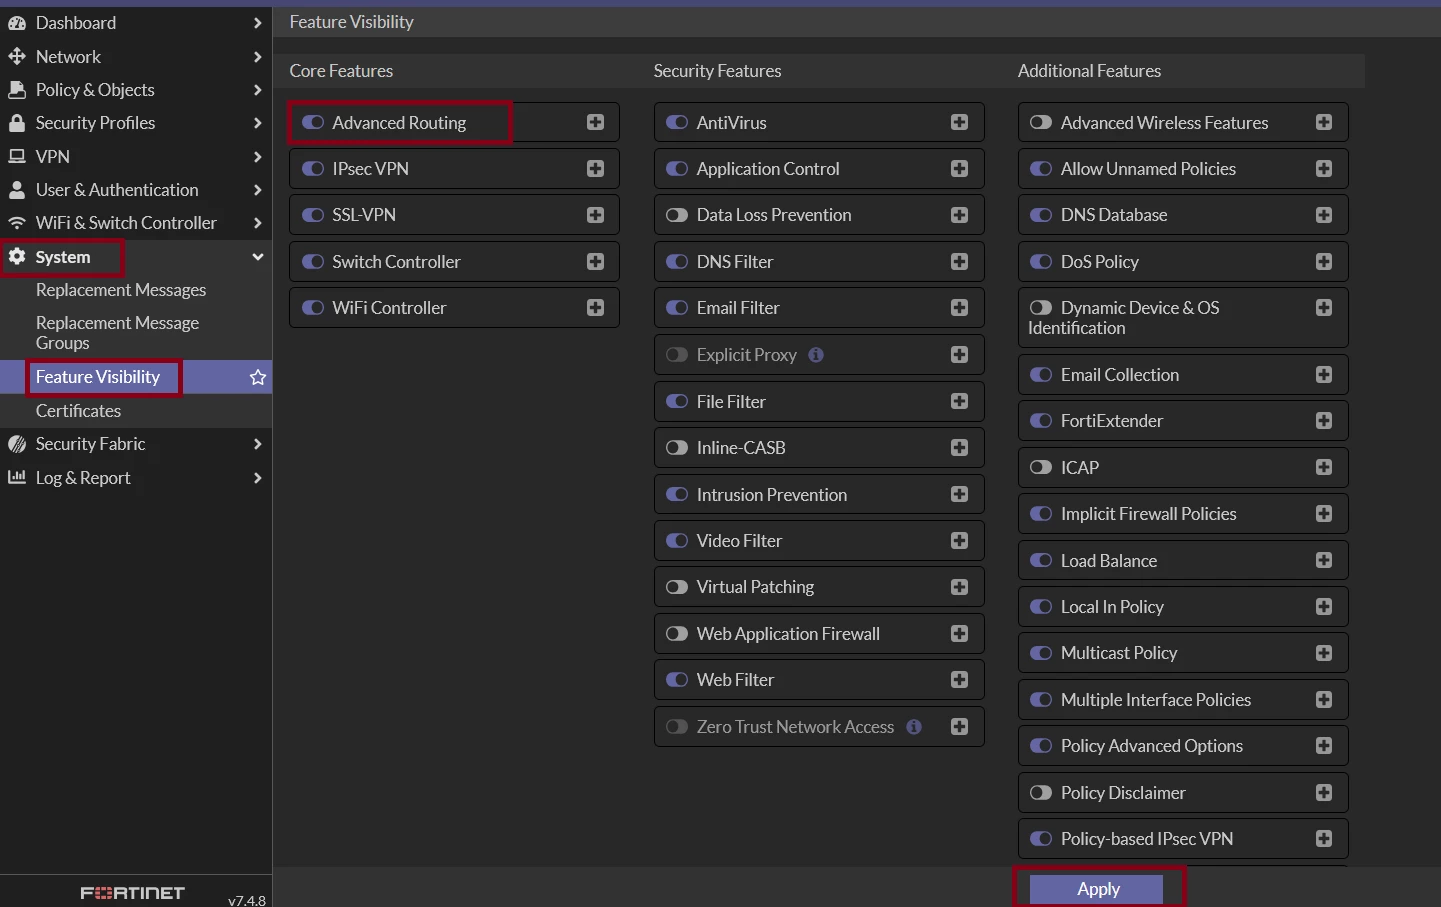
To enable Policy Routes in the CLI:
config system setting
    set gui-dynamic-routing enable
end
Note: If VDOMs are enabled on the FortiGate, the feature needs to be enabled in the specific VDOM they are to be configured in via the CLI. Sample syntax is below:
FGT_3 # config vdom
FGT_3 (vdom) # edit root
current vf=root:0
FGT_3 (root) # config system setting
FGT_3 (settings) # set gui-dynamic-routing enable
FGT_3 (settings) # end
Once the policy route is enabled for feature visibility, it should be possible to get it on the path below.
Go to: FortiGate GUI -> Network -> Policy Routes.
Configure it by following the steps below to forward the traffic over a specific port by overriding the routing table. Select 'Create New'. Protocol: Select from existing options or specify the protocol number to match. The Internet Protocol Number is found in the IP packet header. RFC 5237 describes protocol numbers, and a list of the assigned protocol numbers is available here. The range is from 0 to 255. A value of 0 disables the feature (Commonly used Protocol numbers include 6 for TCP sessions, 17 for UDP sessions, 1 for ICMP sessions, 47 for GRE sessions, and 92 for multicast sessions). Source Address/Mask: To perform policy routing based on the IP source address, type the source address and network mask to match. A value of 0.0.0.0/0.0.0.0 disables the feature. Destination Address/Mask: To perform policy routing based on the IP destination address of the packet, type the destination address and network mask to match. A value of 0.0.0.0/0.0.0.0 disables the feature. Internet Service: To perform policy routing based on the Internet Service of the packet for the destination, add the Internet Service from the list of ISDB available. Examples of Internet services: Fortinet-FTP, Adobe-DNS, Amazon-AWS, etc. The ISDB-based policy route is only available for the destination hosts or addresses. ISDB cannot be used in the source in the policy routing. Type of Service: Use a two-digit hexadecimal bit pattern to match the service, or use a two-digit hexadecimal bit mask to mask out. For more information, see Policy Routes. Set action: Select the Action of the policy route, whether to 'Forward' or 'Stop Policy Routing' based on the requirement. If 'Stop Policy Routing' is selected, the routing table of the FortiGate device will be checked. Outgoing Interface: Select the name of the interface through which packets affected by the policy will be routed. Gateway Address: Type the IP address of the next-hop router that the FortiGate unit can access through the specified interface. If the outgoing interface is an IPsec tunnel, make sure the interface IP is configured on it. The gateway address will be the interface IP of the remote side. Select 'Status': Enabled. Then select 'OK' to save and apply the configuration.
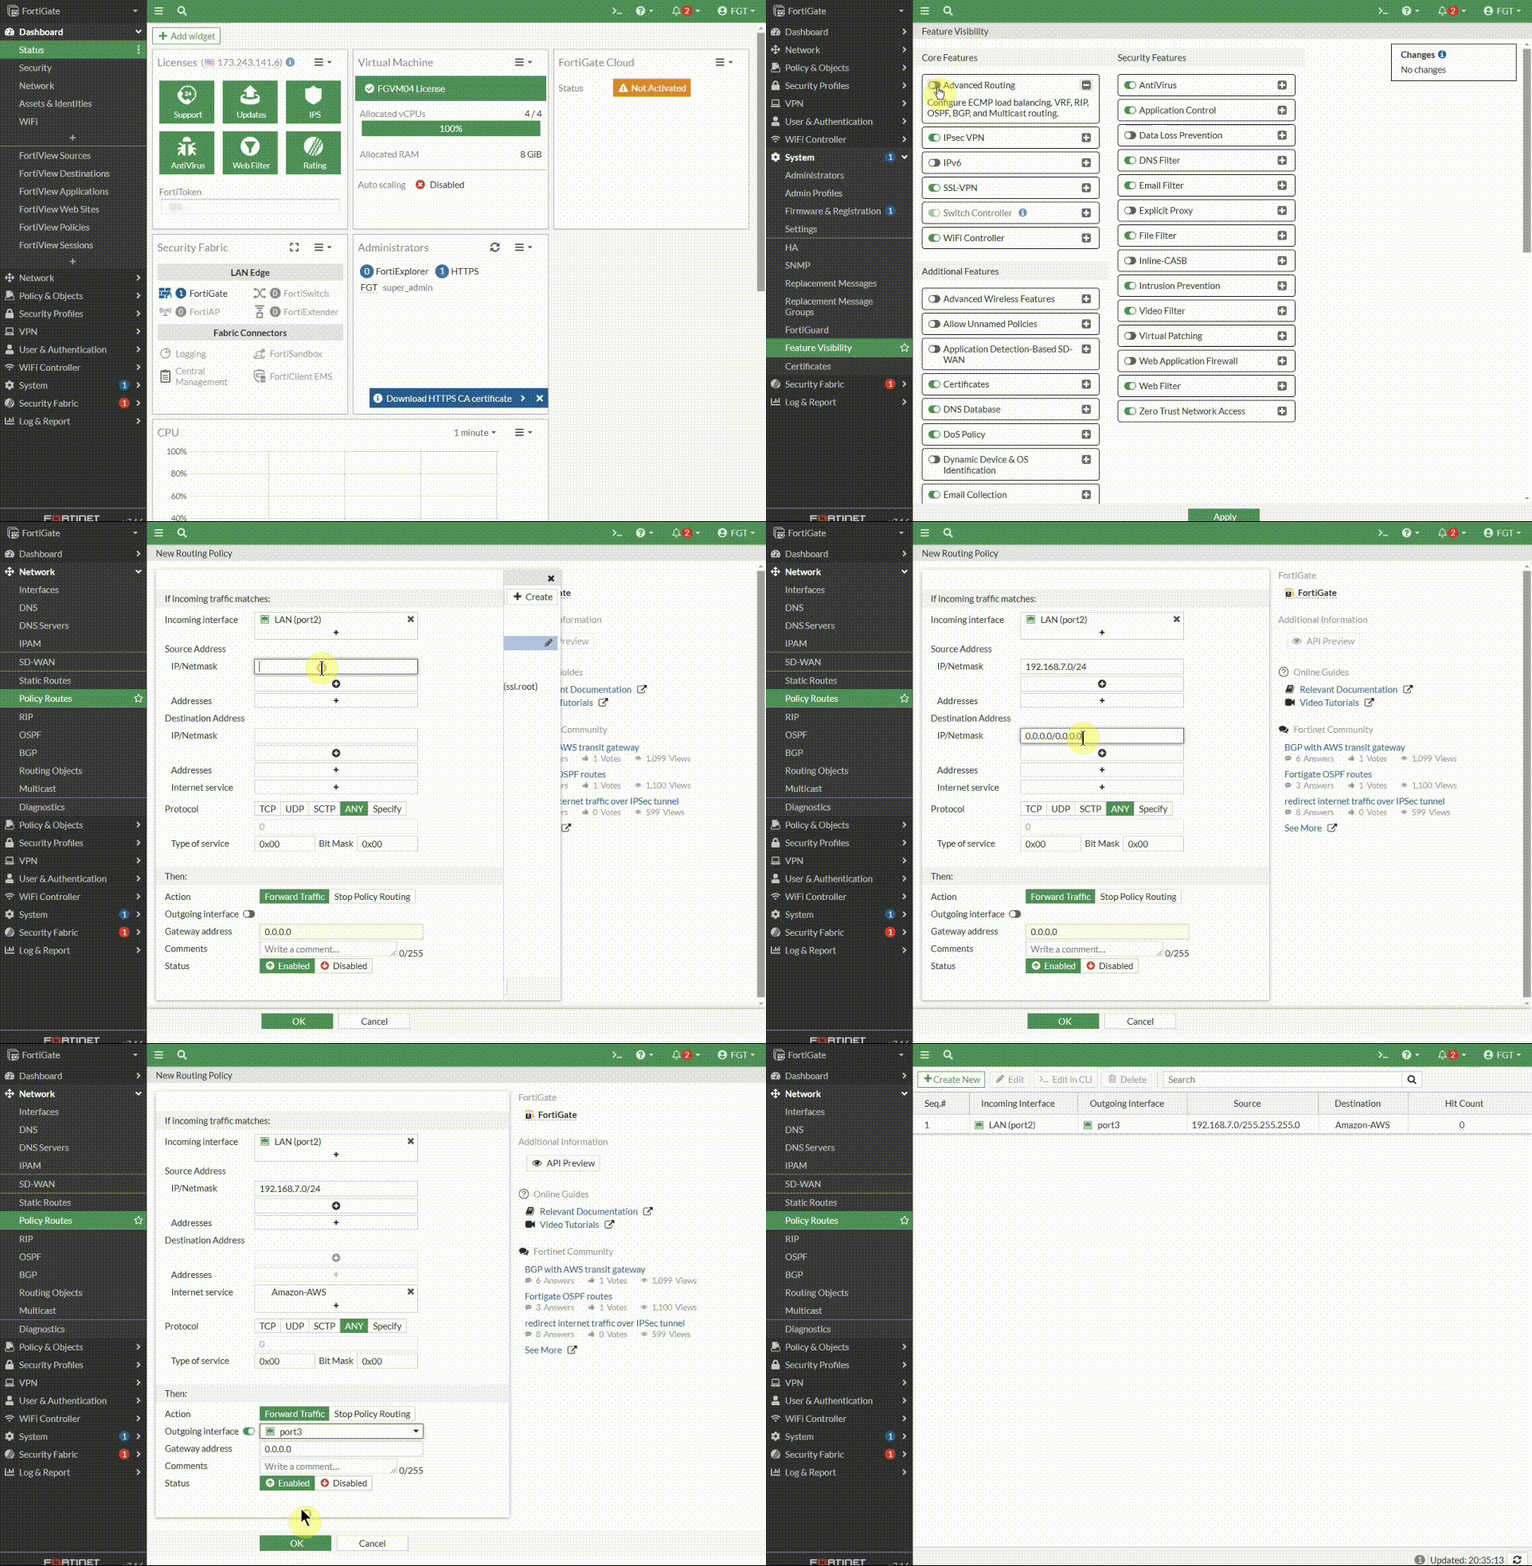
To configure policy routes using the CLI, the following commands are available:
FGT # config router policy
    FGT (policy) # edit 1
        set input-device
        set input-device-negate
        set src
        set srcaddr
        set src-negate
        set dst
        set dstaddr
        set dst-negate
        set action
        set protocol
        set gateway
        set output-device
        set tos
        set tos-mask
        set status
        set comments
        set internet-service-id
        set internet-service-custom
    next
end
Policy routes are executed in order (similar to firewall policies), so more specific policies should be placed on top and more general ones near the bottom.
Notes:
If the interface is on DHCP, the Gateway IP address can be left as 0.0.0.0 or blank. However, it will be necessary to have a valid and active route in the routing-table via the outgoing interface. Otherwise, the traffic will not follow the policy route. Starting from FortiOS v7.6.3, users and user groups can be configured as source filters in IPv4 and IPv6 policy routes through the CLI. Starting from FortiOS v8.0.0, users and user groups can also be configured as source filters through the FortiGate GUI.
This enhancement allows policy routes to select traffic based on authenticated users or user groups in addition to source and destination addresses, interfaces, protocols, and ports.
To configure users and user groups as source filters in the GUI: Go to Network -> Policy Routes. Select Create New and select Policy Route. Configure the required policy route parameters, such as Incoming Interface, Source Address, and Destination Address. Under the source filter settings, configure the required User or User Group. Select OK to save the policy route.
The configured user and user group are used as source filters for the policy route.
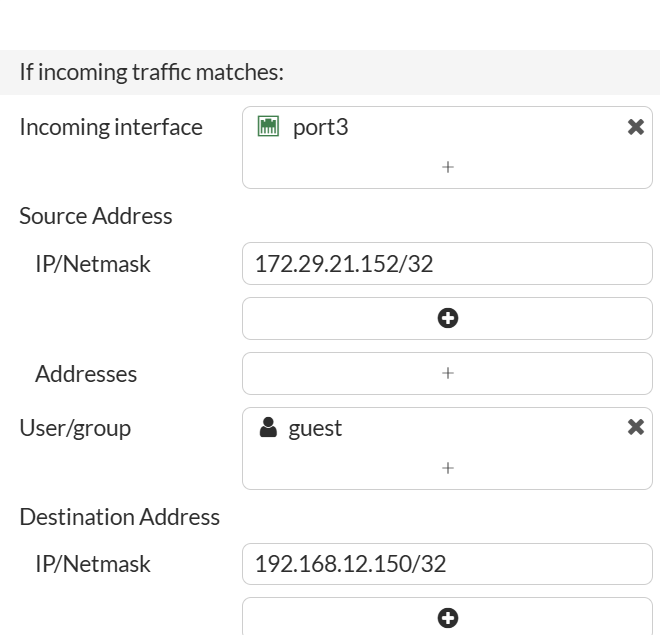
For more information, check the following document: Support configuring users and groups in policy routes.
An SD-WAN zone cannot be chosen in the interface section of the policy-route, as explained in Policy routes. However, SD-WAN zones can be used in firewall policies for more granular control. To work around this limitation, create policies based on the SD-WAN zones indirectly by using the SD-WAN rules that reference the zones. This allows for effective traffic steering and control based on the defined SD-WAN zones. It is possible to control traffic flow for SD-WAN zone members this way. Policy routes will take precedence over any other routes in the routing table. FortiGate will first check regular policy routes before coming to SD-WAN policy routes (if any) and then the routing table.
Requirement: The routing table must have an active route to the gateway or the destination.
Use the following command in the CLI to check the active routing table for the Destination:
diagnose firewall proute list
diagnose firewall iprope list
get router info kernel
get router info routing-table all
get router info routing-table detail <dst-ip>
diagnose ip route match <dst-ip> <src-ip> <inbound-intf> <protocol> <dst-port>
If no such route exists or the route is inactive (for example, interface down), the policy route will fail to forward traffic. To forward the IPsec tunnel traffic through the policy route, the active route does not need to be present in the routing table. Assigning the 'IP' address and 'Remote IP' at the tunnel interface will help to route the traffic through the policy route, as it will create a routing table entry that can be used as a gateway in the policy route. See Technical Tip: Configure policy routes for route-based (interface-based) IPsec VPNs.
Verification of configuration and troubleshooting:
For example, generate some test traffic from the configured source IP/subnet and check the traffic logs for the outgoing interface:
To verify which policy route the traffic is matching, use:
diagnose ip proute match <destination ip> <source ip> <incoming interface> <proto> <destination port> <source port>
For more information, check the following document: diagnose ip proute.
Note: Before applying the Policy Route, verify that the outgoing interface is operational and that the next-hop gateway is reachable when a gateway is configured.
The following commands can be used to confirm the behavior:
diagnose firewall proute list
This command displays the currently configured policy routes and can be used to verify their order and matching criteria.
Related documents:
|