
Technical Tip: Reverse proxy
Description
This article describes configuring a reverse proxy (SSL offloading) using two different methods.
Scope
FortiGate.
Solution
Diagram.
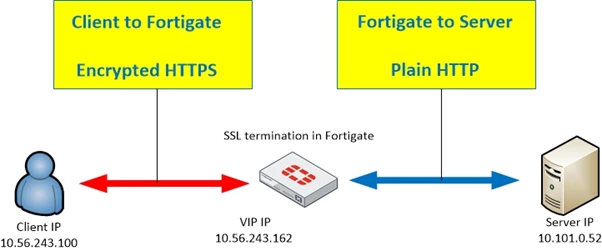
FortiGate SSL offloading allows the application payload to be inspected before it reaches the servers.
Method 1 - Normal VIP with custom SSL inspection profile.
- Create a Virtual IP for the web service.
config firewall vip
edit "web"
set extip 10.56.243.162
set extintf "any"
set mappedip "10.101.0.52" <----- Web server internal IP.
next
end
-
Import the server certificate into FortiGate under System -> Certificate and then define the certificate below.
config firewall ssl-server
edit "websrv"
set ip 10.101.0.52 <----- Web server internal IP.
set ssl-mode half
set ssl-cert "wildcard_lab_com_au"
next
end
-
Create a custom deep inspection profile.
config firewall ssl-ssh-profile
edit "custom-deep-inspection"
set comment "Customizable deep inspection profile."
config https
set ports 443
end
config ftps
set ports 990
end
config imaps
set ports 993
end
config pop3s
set ports 995
end
config smtps
set ports 465
end
config ssh
set ports 22
end
set use-ssl-server enable <----- Ensure to enable this setting.
next
end
-
Create a firewall policy with a destinated VIP and a custom SSL inspection profile.
config firewall policy
edit 2
set srcintf "port10"
set dstintf "port2"
set srcaddr "all"
set dstaddr "web"
set action accept
set schedule "always"
set service "HTTP" "HTTPS"
set utm-status enable
set logtraffic all
set webcache enable
set webcache-https enable
set fsso disable
set ssl-ssh-profile "custom-deep-inspection"
set nat enable
next
end
Method 2 - Server Load Balance (SSL-mode half).
- Create a Server load balance object.
config firewall vip
edit "Web"
set type server-load-balance
set extip 10.56.243.162
set extintf "any"
set server-type https
set extport 443
config realservers
edit 1
set ip 10.101.0.52 <----- Web server internal IP.
set port 80
next
end
set ssl-certificate "wildcard_lab_com_au"
next
end
-
Create a new firewall policy with the destinated VIP.
config firewall policy
edit 2
set srcintf "port10"
set dstintf "port2"
set srcaddr "all"
set dstaddr "Web"
set action accept
set schedule "always"
set service "HTTP" "HTTPS"
set utm-status enable
set inspection-mode proxy
set logtraffic all
set webcache enable
set webcache-https enable
set fsso disable
set ssl-ssh-profile "deep-inspection"
set nat enable
next
end
Note: To enable web cache and web cache-https in the IPv4 policy, make sure that the policy is in proxy-based mode and deep-inspection is enabled in the policy.
A case that needs more than one web server with its certificate.
When using Let's Encrypt, it is not possible to use a wildcard per a limitation, then it is necessary to create a certificate for each CN that is bound to the respective web server.
If Let's Encrypt is not used, but it is the same scenario (one certificate for each web server), the following procedure is the same:
Create a Virtual Server for each Web server and set the respective certificate as well.
Related article:
Technical Note: HTTPS/SSL load balance and SSL offloading option missing in GUI
